
Learn how to create sparkling ice lanterns with step-by-step guidance on gathering materials, filling balloons, and unveiling your creations. This guide covers everything from selecting the right balloons to personalizing your lanterns with decorative elements. Transform simple supplies into enchanting outdoor decor that will amaze your family and friends. Perfect for winter celebrations or cozy evenings, these ice lanterns bring a magical glow to your space. Discover tips for safe handling and creative display ideas that will make your crafting experience enjoyable and memorable.
Gathering Your Materials for a Sparkling Ice Lantern
Creating a sparkling ice lantern can be a delightful crafting experience, and having the right materials is crucial for success. To begin with, you will need balloons in various sizes. The size of the balloon directly influences the size of the ice lantern; larger balloons will yield bigger lanterns that can hold more decorative elements, while smaller ones will create more delicate and intricate designs. It is advisable to select high-quality party balloons, as they are more durable and less likely to burst during the freezing process.

Water is another essential component of this project. Tap water is usually sufficient, but using distilled water can yield clearer ice. If you prefer, you can enhance the appearance of your lantern by adding food coloring to the water for a vibrant effect. This can create a beautiful contrast against the natural elements you choose to include. Decorative elements such as twigs, berries, or even small pinecones can be added to the water mixture inside the balloon to personalize your ice lantern, giving it a unique touch. Selecting these elements based on the season can add charm, with winter berries or autumn leaves providing distinctive features.
Please, read our post and do not forget to check our YouTube channel “Grig Stamate”:
https://www.youtube.com/@GrigStamate
You will find there, thousands of designing, furnishing, and decorating ideas for your home interior and outdoors.
Allow me to mention one of them:
Acrylic Ghost Chairs | Modern and Smart Home Furnishing Ideas (video)

Your freezer will serve as an essential piece of equipment during this project. Ensure that you have ample space for your balloons, as they require several hours to freeze completely. A fun anecdote worth mentioning is an experience where using thin, party-store balloons led to a rather comical situation: while testing the freezing technique, the balloons started bursting due to the pressure of the water expanding as it froze. This resulted in a messy but unforgettable lesson. Therefore, investing time in gathering sturdy materials can make your crafting experience more enjoyable and successful. Once you have everything prepared, you can proceed to create your sparkling ice lanterns.
The Balloon Trick: Filling and Freezing
Transforming a simple balloon into a mesmerizing ice lantern begins with the essential task of filling it with water. Start by selecting a balloon that is durable enough to withstand the freezing process. It is advisable to choose larger balloons, as they allow for a more impressive lantern once the ice has formed. The first step is to carefully fill the balloon with water, ensuring that you do not overfill it. Leaving some space at the top will prevent the balloon from bursting due to the expansion of water as it freezes.
Once you have filled the balloon appropriately, tie it securely. It is beneficial to place the filled balloon in a sturdy bowl or container to catch any spills that may occur while handling it. This setup offers you some leeway in coming up with creative shapes for your ice lantern. At this point, patience is essential; transporting the balloon to your freezer requires careful maneuvering to avoid any accidental punctures. As it freezes, the anticipation builds—imagine the enchanting glow it will emit once complete!
For optimal results, allow the balloon to freeze for at least six to eight hours, though overnight freezing is ideal. This duration varies based on freezer settings and the size of the balloon. If you experience an unfortunate popping incident while the balloon is still in the freezer, do not despair. You can salvage the situation by carefully cleaning up the mess and starting anew, always remembering to take caution during filling. The process of making an ice lantern is about more than only the end result; it’s about enjoying the creative flow and bringing a touch of magic to your outdoor space while engaging in a fun, whimsical activity.
Unveiling the Magic of Your Ice Lantern
The moment you’ve been eagerly awaiting has arrived: it’s time to remove your ice lantern from the balloon. This exciting step is pivotal, as it ultimately reveals your beautifully crafted masterpiece. To begin, ensure that the ice has completely frozen; this may take anywhere from several hours to overnight, depending on the size and thickness of the lantern. Once you’re confident that the ice is solid, find a safe and spacious area to perform the unveiling.
Start by carefully puncturing the balloon. A pin or sharp object is ideal for this task—ensure it’s only the balloon that’s being pierced, as you want to maintain the integrity of your ice lantern. Gently pull the balloon away from the ice. Take your time during this step; rushing could lead to cracks or chips. If the balloon seems stubborn and does not peel away easily, consider using warm water to melt the balloon slightly from the outside, which can assist in detaching it without causing damage.
As you peel away the latex, be prepared for a sense of wonder and anticipation—each ice lantern is unique. You might encounter surprises, such as varying textures or unexpected shapes that enhance your lantern’s beauty. There’s no shortage of ‘oops’ moments too; perhaps the lantern cracked unexpectedly or the ice did not form as intended. Oftentimes, these mishaps can lead to creative solutions and memorable stories about your crafting adventure.
Upon unveiling your creation, emotions may vary. Some may feel a rush of joy and accomplishment, while others may experience nervousness about the final appearance. Regardless of how your ice lantern turns out, remember that this process is meant to be enjoyable. In the end, whether by celebration or a few light-hearted laughs, each ice lantern brings with it a sense of achievement and creativity to share with others. So gather your friends or family to witness the moment together!
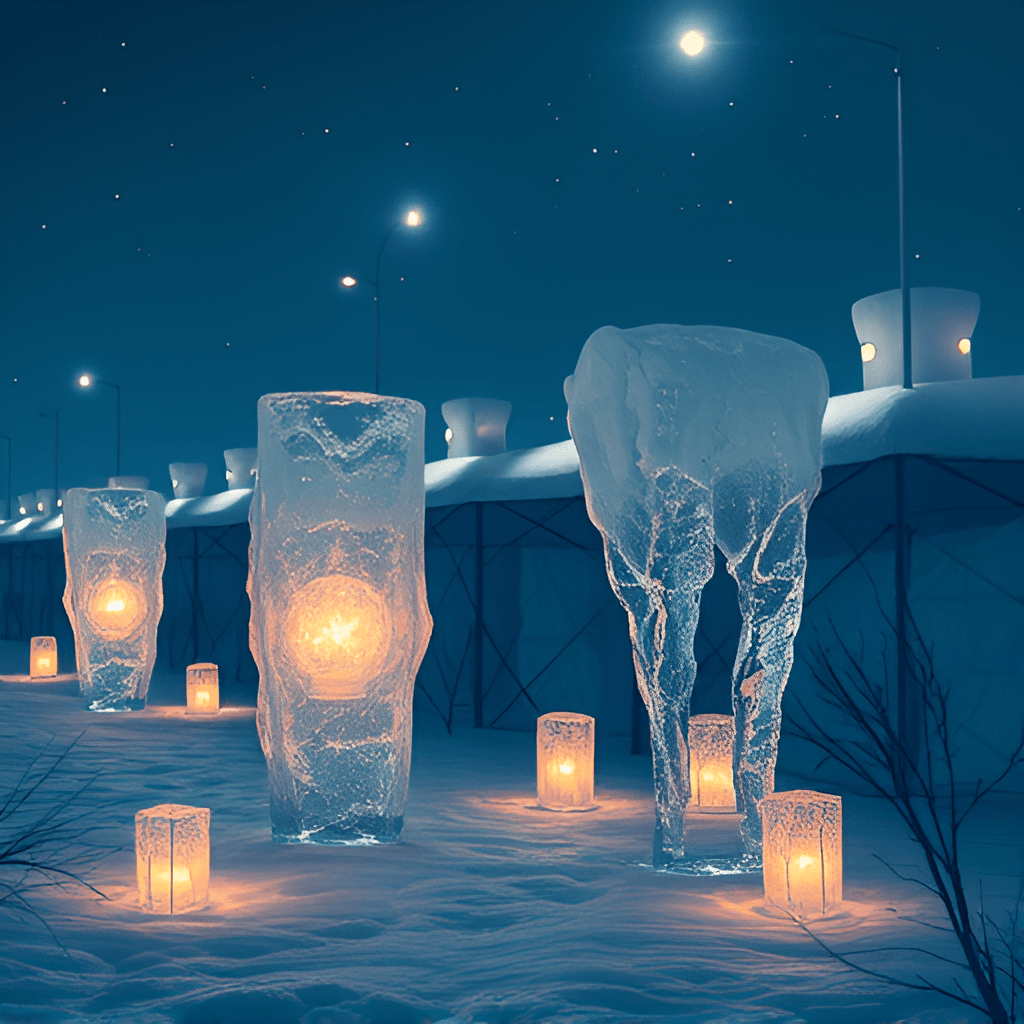
Personalizing Your Lanterns: Decorating and Displaying
Once your ice lanterns are successfully crafted, the next step is to personalize them, ensuring each piece reflects your unique style and creativity. One of the most exciting ways to achieve this is by adding lights inside the lanterns. String lights can create a gentle glow that illuminates the frozen structure beautifully. By experimenting with different colors and sizes of lights, you can create a myriad of effects, from cozy warm tones to festive bright colors, that can transform your icicle lantern into an enchanting focal point.
In addition to internal lighting, take the opportunity to embellish the exteriors. Nature provides an abundance of decoration ideas; you can incorporate beautiful leaves, twigs, or seasonal berries to the surface of the ice. Secure them with a light spray of water before the final freeze, allowing nature to merge seamlessly with your art. Glitter can also be an enticing option that adds a touch of sparkle, enhancing the magical aura of the lantern after dark. For those who prefer a more artistic approach, you might explore painting the ice with food coloring or edible glitter, providing a fun twist that will enchant both children and adults alike.
As for displaying your creations, consider placing them in a row along a pathway, illuminating the way during evening gatherings or holiday celebrations. Grouping several lanterns together can create a stunning visual effect and an ambient atmosphere. For an added touch, place them amidst evergreen boughs on your porch or patio. The glow from the lanterns will beautifully contrast with the natural foliage, creating a winter wonderland right outside your door.
The reactions from family and friends are a true highlight of unveiling your ice lanterns. Witnessing their amazement and delight can be incredibly rewarding and makes the effort worthwhile. We encourage readers to share their personal experiences and innovative lantern designs, fostering a community of creativity and inspiration.
Other related posts from our website:
https://howtobuildahouseblog.com/29-easy-diy-projects-to-update-your-home-over-the-weekend/
https://howtobuildahouseblog.com/15-weekend-projects-for-home-and-garden-diyers/
https://howtobuildahouseblog.com/room-dividers-smart-diy-and-creative-ideas-2/
Thank you so much for your attention.
Stay tuned. We will upload many other amazing posts to our website and videos onto our YouTube channel.
Thank you so much.
for your time and attention.
Best Regards
See you to another post,
Bye, Bye