Mold, regardless of its form, is a serious danger to human health leading to very serious illnesses and even death. It is therefore, strongly recommended that when you find mold in your home to remove it as soon as possible.
By Gold Coast Flood Restorations Santee – See more Home Design Photos
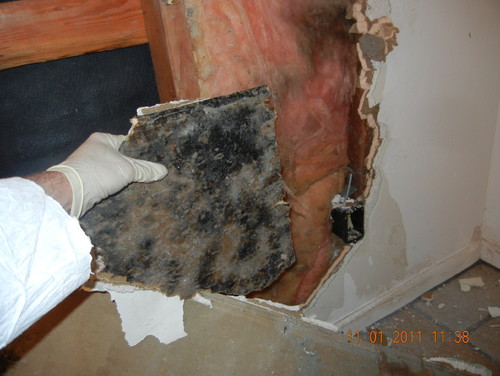
It is known that mold generally occurs in wet or high humidity places, without adequate ventilation such as bathrooms or basements. Mold grows in dark places and uses as substrate various building materials including drywall (sheetrock). The affected drywall is compromised and you need to replace it with a new one, not just clean it.
However, before removing and fixing the moldy drywall it is wise to remove the source of moisture, to prevent any future problems.
Materials & Tools
Drywall (Sheetrock); Drywall saw; Utility knife; Putty knife; Bleach (or Antimicrobial solution); 2 Pieces wood studs; Drywall screws; Drywall tape; Drywall compound; 150-grit sandpaper.
Steps:
1. First, you need to cut out and remove the compromised part of your drywall. Using your utility knife cut out all part of drywall that contains moisture preventing in this way, any future mold spores spreading. Try to cut your drywall in a rectangular shape, along straight lines. In this way, you will greatly facilitate the replacement of the compromise part with the new one.
2. Using you putty knife scrape all visible mold from inside the cavity of wall. Prepare a bleach solution or use antimicrobial solution and clean thoroughly the wooden studs and the interior drywall surface. This will prevent the spread and recurrence of mold.
3. If your cut has a rectangular shape, then you will come easy to install the new piece. So, measure your cut and cut a new drywall piece to fit.
4. If the wall cavity is large enough and your patch covers the distance between two studs you need only, to fasten this patch to the studs. If it is not large enough, cut two wooden stud pieces. Your stud pieces must be at least 2 inches longer than the sides of your cut. Use drywall screws and fasten these two pieces inside of your cut at the two edges of the wall cavity. Place your drywall patch on the studs and then fasten it with drywall screws.
5. Use a putty knife and apply drywall compound along the joints. Apply drywall tape over this thin layer of joint compound. Use your putty knife and embed your drywall tape into the drywall compound.
6. Allow time to dry and then apply a joint compound coat all around on tape. Allow again the drywall compound to harden.
7. Using 150-grit sandpaper sand the hardened compound. If necessary, reapply a thin coat of drywall compound and repeat again the procedure.
8. Make all necessary finishes. It is a good idea to repaint the surface using a specific paint that contains a fungicide additive. In this way, you can minimize the risk of mold recurrence.
Eliminating Mold from Cottage Walls – Tips and Ideas (howtobuildahouseblog.com)


