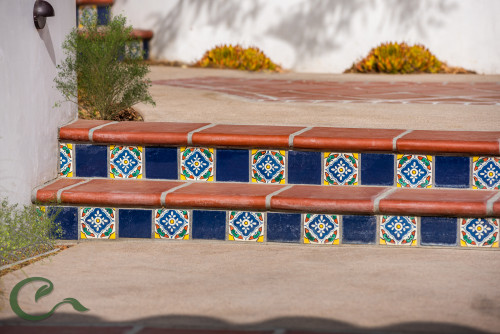
Ceramic tile is a commonly used finish material, used everywhere in the world. It comes in a huge array of colors, sizes, shapes and designs. This wide variety will allow you to create the base for almost any decorating style.

Photo by Conscious Environments Inc. – Look for landscaping pictures
Exterior stairs are most commonly made using concrete, as concrete is among the most durable and long lasting building materials. However, over time the steps may be chipped, begin to crack, stains, discoloration and a generally worn-down appearance are a little tougher to handle.
One solution is to apply tile to exterior stairs which will give them a face lift, a new appearance.
What You Need:
Tri-Sodium Phosphate; Tile; Mortar bed; Portland cement paste; Grout; Concrete sealer; Trowel; Tape measure; Tile cutter; Cloth
1/ Prepare the steps:
Before you begin to lay the tile over your concrete steps, make sure that the concrete surface is properly prepared.
Mix up a bucket of the TSP solution and use it to scrub the floor with a scrub brush. It helps remove dirt, grease and oil. You need to make sure that your surface is clean, not only for the mortar, but for your leveler and patch to stick as well. Allow it to dry thoroughly.
Examine the floor and see if there are any cracks or pits that need to be fixed before you lay the tile. If any steps have cracks all the way through them, they will need to be repaired before they are tiled.
2/ Seal the concrete steps:
Once your repairs have dried, take the time to seal the concrete. This will prevent moisture from settling under your tile, and will also allow your mortar to stick tightly.
3/ Plan the tile layout:
Dry-lay all your tiles ahead of time to plan the layout and prepare any special cuts that need to be made.
4/ Lay the tile:
Mix the mortar as directed on its packaging. Use the flat side of trowel to apply the thin-set and the comb edge of the trowel to create grooves. This will give you a really tight connection to your slab.
When tiling the steps, start with the risers. Apply the tiles to the face of a vertical step riser, lining up the upper edge of the tile flush with the edge of the horizontal stair tread, and using the mastic trowel to apply mortar to the back of the tiles.
Use spacers to achieve consistent gaps between tiles. Trim any tiles to fit, using the tile saw.
Apply the tiles to the stair tread surface, lining up the edge of the tile flush with the edge of the vertical stair riser tile (installed previously), and using the mastic trowel to apply mortar to the back of the tiles.
5/ Apply the grout:
Mix the grout as directed on its packaging. Mix only one bag at a time to keep color and thickness as consistent as possible.
Remove tile spacers. Remove any excess mortar that sticks up between the tiles with a utility knife.
Evenly apply the grout to the joints left between each tile, using the grout bag. Work your way from the top of the stair set, to the bottom, cleaning any excess grout from the tile surfaces with the sponge; rinse the sponge in water as you work.
6/ Clean up:
Once the grout is completely dry, take a wet rag and wash the surface of the entire floor. As the floor dries, you will probably notice a haze forming over the tile. Allow it to dry completely again, and then go back over it with a slightly damp rag – this should polish the haze right off.
7/ Apply exterior sealing caulk:
Allow two weeks for the grout to fully cure before sealing with a high quality grout sealer. This will make the grout moisture resistant, which is especially important on outside tile jobs.
How to Use Wood Filler on Your Wooden Stairs (howtobuildahouseblog.com)


