Today, the idea of installing a pre-fabricated spiral staircase has become increasingly popular. At a first glance, building up a spiral staircase on your own is seems to be complicated, but is much simpler than you think.
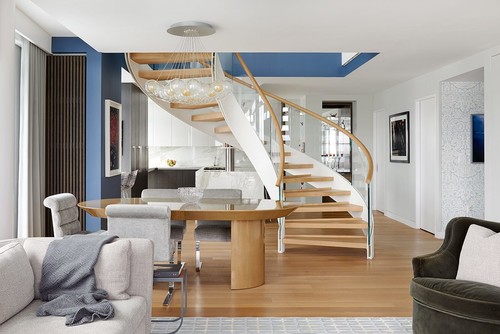
Photo by European Cabinets & Design Studios – Search staircase design ideas
You just have to follow certain spiral staircase specifications carefully.
Where Can You Use a Spiral Staircase?
Spiral staircases are great for houses where you need a way to go from the first to the second level in a limited space.
However, its great look which enhances the overall home decor and has got a nostalgic feel associated with it.
A spiral staircase can add an element of charm and elegance to any home or building.
Your Home Interior Style and the Staircase (howtobuildahouseblog.com)
Planning and Preparation
1] Before starting to build check the building codes in their area and obtain the required permit from the local authority. If you are buying a kit, many companies will not send you the kit until they see a signature from a building inspector.
2] You have to figure out the exact location where you would like to put up the stairs in your house. There are two important factors to take in consideration:
a) Though the wall plays a major role in adding strength to a spiral staircase but the central pole should not be positioned anywhere too close to the wall. Otherwise, you will face a lot of difficulty to get the turn during installation of the staircase.
b) The staircase should be set at such a place where there is sufficient headroom. Keep in mind that the usual norm is that a head room of 6 feet 6 inches should be there at the top stairs.
3] Begin the stairs from a loft or floor opening for an easier start. It is always easier when installing a pre fabricated kit to start from the upper floor and continue to work towards the lower floor and landing. This is mainly due to the fact that the head room allotted at the upper entrance to the staircase will determine the lower positioning.
4] Take the accurate measurements of the height and diameter of the staircase. You have to include 2 inches of space from walls and the floor of the stair steps for the handrails. If required, take the measurements twice as you cannot afford to make any mistake. While calculating the tread height, the width of the area outside the steps has to be taken into account.
5] Hire an architect or use a computer-aided design (CAD) program to draw the plans for your spiral staircase. Another solution is to purchase a DIY (or do it yourself) spiral staircase kit from the manufacturers after selecting the right design from their catalogs. The kit has all tools and materials that are needed for construction of a spiral staircase. Generally, the kit has all tools and materials that are needed for construction of a spiral staircase.
6] Use a plumb bob to reference where the staircase’s center pole will be by hanging it from the top landing to the floor below. Mark the location where the plumb bob touches the floor. The pole will be the same length as the floor-to-floor height measurement for the stairs.
Place the base plate on the designated area of the floor on a leveled surface and fix it onto the ground. The entire weight of the staircase comes on this pole and it should be strong and steady enough to bear that pressure. The steps will wind up around and beside the pole.
7] Spiral staircases can be constructed of wood, metal or even a combination of the two. Calculate your tread height. The width determined for this is the outside of the steps, not the inside.
A band saw can be used to cut the wood needed for your staircase. Spiral staircase kits are also available for purchase and assembly. However, the minimum length of each of the treads should be of 36 inches so that one can climb the stairs comfortably. Make sure that their width is 4 inches and not more than that. This will give a smooth gradation to the flight of steps. Similarly, cut all the risers each with a width of 4 inches.
8] Follow your drawn plans and weld or attach the treads of the staircase to the pole. Install the top and bottom step to the center pole. Install the rest of the stairs, attaching them to the center pole. Then slide the risers vertically in between two treads. This will add more stability to the treads of the staircase. In order to maintain a uniform space in between two steps, circular spacers are inserted over the circular pole.
9] The handrail, decorative step covers, center pole caps and thresholds should be installed once your center pole treads and risers are securely in place.
 Concrete Steps – Advantages and Types")

