The kitchen is perhaps, the most used room in your home. Venue is an important activity, where you meet up with family and friends. The outdoor kitchen finds increasingly more room in our lives. An outdoor kitchen meets the needs of our contemporary life. In fact, we extend outdoor, our living space. We can spend unforgettable times outdoor with family and friends without having to move us all the time after the plates of food and drinks.
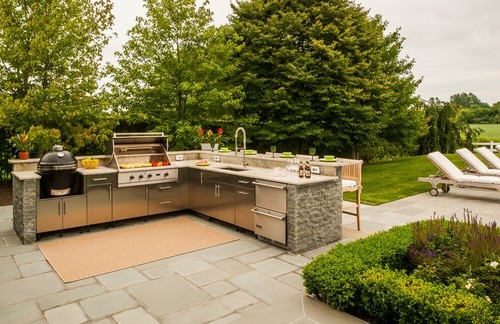
Photo by Outdoorliving By Kenneth Reilly – Search patio pictures
You need a good and efficient kitchen design that respects the principles of sustainability and aesthetics. Another factor to be taken into account when designing an outdoor kitchen is access to utilities such as water, drainage, electricity and natural gas.
Custom outdoor kitchens may differ much in terms of size, equipment or price. Sure, you can choose an expensive project with walls made of real stone, but you can choose as well a kitchen made of stone veneer.
Veneer is a wise option. It is much lighter than real stone, easy to handle, almost free maintenance (no need painting or sealing), durable and long lasting. In addition, it is hard to distinguish to real stone.
Of course, the construction of an outdoor kitchen will take time, but with good planning and tenacity, you can finish it in two weeks.
The Outdoor Kitchen Island
The outdoor kitchen project, which will speak further, comprises a grill with a base made of veneered-plywood with cabinets below and a countertop with a working place and a sink.
The countertop frame is made of three boxes, built separately and then screwed together, thus supporting a large countertop surface.
The countertop can be concrete or any other kind of stone, placed at a height of 38” from the floor.
The floor is a sloped concrete slab allowing water to drain.
In fact, a patio floor will be more than suitable for our project.
Use pressure treated 2x4s and plywood (3/4” thickness) for frame.
It is much easier to work with this kind of material than concrete blocks.
The middle box should be large enough to support the grill. Depends on the box sizes, but you can adjust one of the other two to include a built-in bar with a 90 degree turn. You can design your empty boxes like cabinets with metal doors, drawers and a place for propane cylinder.
The finish of your island can be veneered or cultured stone, which is lightweight and easy to install. Sort your veneer pieces before installation. Your job will be easier and better done.
1. Build the frame
Building the frame is easier than you think.
a) Cut eight equal lengths of 2x4s; these will be the posts of island three boxes.
b) Cut a 1 ½” deep x 3 ½“ high notch at the bottom and the top of each post
c) Cut four pieces of 2x4s to the depth of the box.
d) Cut four pieces of 2x4s minus 3” to the width of the box
e) Separate the posts of the box with these stretchers.
f) Do not forget your cabinets. Use 2×4 for support. Screw it in the middle of the bottom framing.
2. Sheathe the frame
Your counter will be composed of these three boxes. Therefore, screw them together side by side.
To protect the bottom of the posts, screw metal post standoff to the bottom of each post.
The walls of your counter will be made of plywood.
a) Measure and cut plywood.
b) Before laying the plywood, run a bead of adhesive.
c) Screw the plywood to the 2x4s with 2” screws.
d) Measure and cut openings for cabinets.
e) Built the cabinets outside. Use also plywood to create the necessary boxes.
3. Attach the lath
a) Using a staple gun cover all the plywood surface with builder felt.
b) Start from bottom, and continue upward.
c) Make sure the little cups of the wire lath face up to catch the mortar.
d) Attach the lath to the plywood, using roofing nails.
e) Overlap the pieces of the lath.
f) Protect yourself. Wear gloves.
g) Using the snips trim off the excess of the lath.
4. Apply the mortar
a) Mix the mortar with water until a creamy consistency.
b) Using a trowel spread the mortar over the metal lath.
c) Gently, push the mortar into little metal cups.
d) If somehow, the metal lath move, stop and nail the lath.
e) Cover the surface in such a way as to not see the metal lath.
f) Allow one hour to cure.
g) Then, when this scratch coat is firm, score the surface horizontally.
h) Using a ½“ notched trowel, start scoring at one of the island end.
i) When you are done let the mortar to cure for 24 hrs.
j) Place the cabinet boxes into the openings and screw them with 2” screws.
5. Apply the veneer stones
Supposing you have sort your veneer pieces, start with a corner piece.
a) Using a pointing trowel, apply mortar on the back of the veneer piece.
b) Wipe the excess of the mortar from the edges of veneer piece.
c) Use the pointing trowel to create V-shaped air pockets in the applied mortar.
d) Start from the corner bottom; set the first L-shape veneer piece.
e) Press firmly and scrap the mortar excess.
f) Continue to lay the stones.
g) Using a grinder with a diamond blade cut the stones to dry fit.
h) Trim the larger veneer stones.
i) When the first course is done, continue upward from the same corner.
j) Give a natural look. Incorporate different sizes and colors.
k) Allow stones to set for at least 24 hrs.
Brick Patio Design – Beautiful and Creative Design Ideas (howtobuildahouseblog.com)
6. Install fixtures
Install the cabinet doors, the countertops and the grill.
Now it is the time for the accessories such as Chill Beverages, made of a stainless steel box, big enough to keep your refreshments. However, you can add a fridge, light, wheeled cart, etc.


