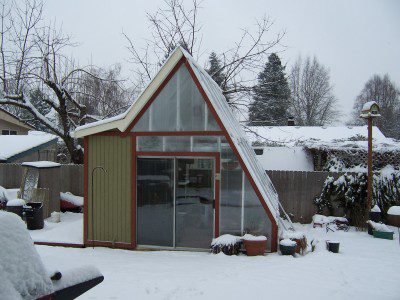
An underground greenhouse is a smart option for those who love gardening, but unfortunately live in a cold climate. You need only, to build your greenhouse few feet into the ground with a slopping roof made from clear corrugated roofing. Earth’s natural thermal insulation, combined with passive heat of the sun will result in significant energy savings.

By Sheila Schmitz – See more Home Design Photos
An underground greenhouse will extend over the annual gardening season. You will be able to have fresh fruits and vegetables most of the year.
Generally, you can build any size you want, but a small size such as 4 by 8-foot greenhouse is large enough for the typical family needs.
Tools & Materials
– Measuring tape;
– Shovel; Level;
– Deck screws;
– Drill;
– Plate compactor;
– Staple gun;
– Scissors;
– Post hole digger
– Gravel;
– Four 4×4-inch pressure-treated posts (two -10 feet long and two – 8 feet long);
– Four bags of quick setting concrete mix;
– Two 2×6-inch pressure-treated boards (8 feet long);
– Two 2×4-inch pressure-treated boards (5 feet long);
– Four 1×8-inch pressure-treated boards (8 feet Long);
– Four 1×8-inch pressure-treated boards (4 feet long);
– One 4×8-feet sheet exterior siding;
– Four 26×60-inch clear corrugated panels;
– One roll plastic sheeting;
– Two 96×1 ¼ -inch wood filler strips.
Steps to Take
1. The most important thing is to choose the place where you will build the greenhouse. Greenhouse should receive as much light as possible. Therefore, the place should have a southern orientation. Clean the site of bushes, rocks, dirt, and debris.
2. Measure the space necessary for your greenhouse. Do not forget its southern exposure.
3. Dig the hole. Your future greenhouse measures are 4×8-foot and 3 feet into the ground. Therefore, you need to dig a hole this size.
4. The next step is digging holes for posts. Hole must have a depth of two foot. So, dig a two foot depth hole in each corner of your 4 by 8-foot pit. These holes are the foundations of your posts.
5. Pour a 3 to 5 inches gravel into these holes and compact it firmly.
6. Place the four 4×4-inch pressure-treated posts in o the holes; the two – 10 feet long in the north side of the pit and the other two – 8 feet long in the south side of the pit.
7. Plumb the posts and pour a bag of quick setting concrete mix into each hole. Allow enough time to dry.
8. Place the 2×6-inch pressure-treated boards – 8 feet long, on the tops of the posts on the North respectively South side of your greenhouse. Screw them with deck screws.
9. Now you need to connect the North side to the South side. You can do these using 2×4-inch pressure-treated boards (5 feet long) for the East and West side of your greenhouse. Measure exact distances and screw these boards between the long 2×6 boards and the short 2×6 boards.
10. Use 1×6 boards for the outer greenhouse perimeter, from the ground to the tops of the posts. Screw them with deck screws. However, before screwing, drill them.
11. For the higher side, northern side, use 4×8-feet sheet exterior siding, which you attach to the 1×6 boards.
12. Use compacted gravel as the greenhouse floor.
13. Using carpenter glue, stick 96×1 ¼ -inch wood filler strips of 2×6-inch pressure-treated boards.
14. Begin in the East side and install the four 26×60-inch clear corrugated panels. Screw them together, but only the top of the waves, into the 2×6 boards (through the strips).
15. Next step is to create walls. Wrap plastic sheeting around the outside of the greenhouse. Staple the plastic sheet to the 1×6 boards. Measure the plastic sheet to be longer than height, cut it, bend it over ground and cover it with soil and rocks.
16. For a better insulation, staple another plastic sheet to the inside part of the greenhouse. Proceed the same as for the outside layer. Let it to extend over the ground and cover it with gravel.
17. Now it is the time for lights, flowerpots, heaters, and generally much-needed accessories for a perfect greenhouse.
Grenhouse Winterizing Tips | How To Build A House (howtobuildahouseblog.com)


