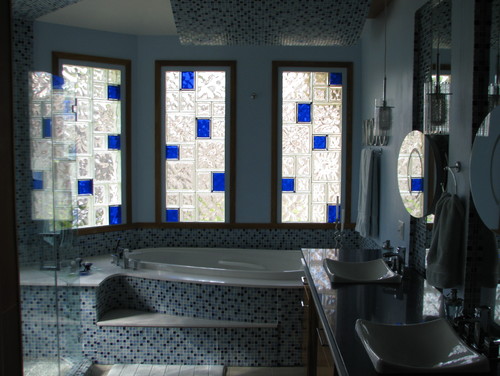
Installing a glass block window is an important step to changing out your tired old bathroom window and capitalizing on the sleek and ultra modern look of glass blocks. There are some major advantages of a glass block window such as: privacy, security, attractiveness and energy efficiency.

Photo by Innovate Building Solutions – More bathroom ideas
Glass block windows, in the basement or bathroom, provide an extra level of privacy and security without blocking natural light.
Glass block windows are 10 times more energy efficient than most basement or bathroom windows in older homes.
Standard glass block have the energy efficiency approximately equal to most thermal pane windows.
Installation
Installing windows made of glass block is a simple project similar with laying cement blocks.
Material & Tools
-hammer, chisel, crowbar, trowel, mortar, striking tool, level, glass blocks, measuring tape, wood screws, wood shims, construction adhesive, rubber mallet
1/ Measure the wall hole area and create the design for the glass block insert. Carefully measure the window opening from the rough frame. Measure at three different places to determine the width (top, middle and bottom and height (left, middle and right). Take the smallest measurement from each to determine your window size. Pre-construct your window on the floor, without mortar, to make sure the glass blocks fit into your opening.
2/ Preparing mortar is an important step when you install your glass block windows. Mortar consistency must be workable but dry enough so that the glass block won’t “float” out of place causing uneven joints. Mix mortar to a bread dough consistency following the manufacturer’s directions.
3/ Put an L-spacer against a bottom corner of the block and a T-spacer on the other bottom corner.
4/ Put a layer of mortar on the window sill and smooth it out with a trowel to create an even “bed.”
5/ Set a 16-inch expansion strip against the inside edge of the window, called the jamb. Set the block with the L-spacer against the window jamb. The expansion strip is between the block and the jamb. Set a T-spacer between the top corner of the block and the jamb.
6/ Then put a layer of mortar on the side of the opening where the first block will butt against the wall. Put mortar on one vertical edge of each block at a time, set a T-spacer between the top corner of the block and the jamb and place them in position to create the first row.
7/ Set a 16-inch extension strip against the jamb. Cut the subsequent strips with scissors so they fit between the spacers. Check the first row with a level if is even.
8/ Repeat the process for each new row until all blocks are mortared in place and the window is complete. Remove the T-spacers from the blocks on the ends near the jambs. Apply a 1/2-inch bed of mortar to the tops of all the bricks.
If the blocks “sink” or “float,” mix some dryer mortar to create more substantial joints. Use the rubber mallet to gently tap blocks into place. Repeat this process periodically as you work.
9/ Let the glass block windows “settle” for approximately two hours or until the mortar is almost dry. Then smooth all joints to remove excess mortar for a clean, professional-looking job. Do this on both sides of the window panel.
10/ Apply white silicone sealant, with a caulk gun, around the perimeter and both sides of the window.
Glass Block Wall Advantages | How To Build A House (howtobuildahouseblog.com)


