Installing lattice board is an inexpensive way to add a visual impact to your porch or deck. In the same time under deck lattice or attached to your home also serve as a barrier from animals going under your home and causing damage to walls, wiring, or plumbing.
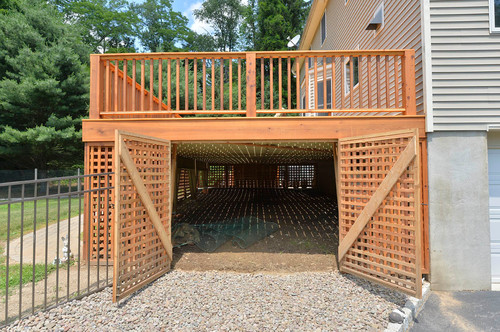
Photo by Kehoe Kustom, LLC – Look for deck design inspiration
What is Lattice?
First of all, lattice was used such as a framework of crossed wood or metal strips used in architectural design. Traditional lattice was used in windows, doors and gates. Today, lattice board continues to be used in fences, decks and trellises as a means of providing privacy while allowing the entrance of light into an outdoor space.
Lattice boards are made of either diagonal or vertical and horizontal wood laths (strips) that cross to make a grille design. Lattice designed for outdoor use is made of natural cedar, pressure treated wood or maintenance-free vinyl fixed together with stainless steel staples or waterproof adhesive.
Installing lattice is an easy project for any homeowner. If you’d like to use the space underneath your deck for storage but don’t want the area to look cluttered and unattractive, install a lattice wall. When you add a lattice wall to your deck you immediately create some more storage room as well as dress up the exposed beams and support system that holds up the deck.
1/ Materials & Tools:
Lattice slats; lattice molding; gate latch; measuring tape; drill; level; speed square; safety goggles; galvanized screws; hinges; circular saw; scissors; marker; hammer.
2/ Take Measurements for Lattice:
-Lattice typically comes in 2-by-8 or 4-by-8 foot sheets that can be cut to meet your building needs.
– If the support posts that are under your deck are more than 4 feet apart, an option would be to install some non-load-bearing posts at 4 foot intervals.
a) Cut 2-by-2 supports to fit the length of the deck posts as well as the area along the bottom of the deck between the posts.
b) Attach the supports to your posts by using deck screws.
c) Measure and cut sections of lattice U-molding to fit each space.
d) Cut the lattice panels to size with a circular saw. Make your measurements, with ¼ inch more on each side to allow for expansion and contraction of the panels.
e) Install the molding onto the lattice and make sure it is seated.
f) Position the panel and molding and drill holes through the molding. Then, you can secure the lattice with screws.
g) Use 2-by-4 to create support for the door. Make a simple door frame out of 2″ by 4″ boards.
h) Attached the top of the support into the deck and then secure the bottom of the support to a stake.
i) Cut a lattice panel to fit the door frame, and attach the lattice to the door frame with galvanized screws.
k) Attach hinges to the door and a door handle.
-Another way and also the easiest way to install lattice panels is to build a frame for the lattice to be attached to. This frame acts as a guide for your measurements so you always have a straight edge to measure to. You can use H-moldings which will allow you to seam pieces of lattice together.
a) After the frames are built for the lattice work to be installed on, you can take the actual measurements for the lattice.
b) Cut lattice with circular saw. When cutting, the most efficient way is to set a piece of plywood on either a stable surface or sawhorses. It will be wise to use an old piece or a few pieces of scrap put together. Set the lattice work on top of the plywood. Having the plywood to cut into will keep the lattice from “chattering”.
c) Attach lattice boards with staples.
d) Install trim to finish off lattice. That will give your lattice work a clean, finished look. Attach them directly on top of the lattice. Start with the bottom trim, then the top and finish with the sides. Cutting a 45 degree angle on each side will add a better finish than regular butt joining.
Composite Decks – Benefits | How To Build A House (howtobuildahouseblog.com)


