Starting a vegetable garden from seed offers numerous benefits, including access to unique varieties, cost savings, and a deeper connection to the gardening process. Learn essential tools and tips for successful seed sowing, soil preparation, caring for seedlings, and dealing with pests. This comprehensive guide also covers when and how to transplant seedlings outdoors, ensuring a bountiful harvest. Experience the joy of homegrown vegetables and transform your culinary creations with fresh produce. Join us in celebrating the fulfillment of gardening, sharing the journey and tips for success along the way.
Why Start a Vegetable Garden from Seed?
Beginning a vegetable garden from seed offers numerous advantages that can greatly enhance the gardening experience. One of the most significant benefits is the increased variety available to gardeners. When starting from seed, individuals have access to many unique and heirloom varieties that are often not found in nurseries. These seeds can produce vegetables with distinct flavors, colors, and textures, allowing for a more diverse and exciting home garden. This variety not only stimulates creativity in the kitchen but also makes the gardening process more enjoyable.
Additionally, starting plants from seed can lead to substantial cost savings. Purchasing mature plants from garden centers can be quite expensive, especially when seeking a diverse selection. By simply investing in packets of seeds, gardeners can cultivate countless plants for a fraction of the cost. This economical approach enables individuals to allocate more resources to expanding their garden and trying new vegetables. Moreover, seeds typically have a longer shelf life than mature plants, ensuring that any unused seeds can be saved for future planting, further maximizing value.
Please, read our post and do not forget to check our YouTube channel “Grig Stamate”:
https://www.youtube.com/@GrigStamate
You will find there, thousands of designing, furnishing, and decorating ideas for your home interior and outdoors.
Allow me to mention one of them:
Beautiful Succulent Garden Arrangements | OUTDOOR DECOR & LANDSCAPING IDEAS #10 (video)
The sense of fulfillment that comes from growing one’s own food cannot be understated. Nurturing seeds from their earliest stages to a thriving harvest fosters a deep connection to the gardening process. Many find joy in witnessing the transformation from tiny seeds to robust plants, which can provide fresh produce for meals. This journey, fraught with both challenges and successes, often leads to a greater appreciation of one’s sustenance. Whether dealing with germination issues or pest management, each stage offers valuable lessons and a sense of accomplishment. For these reasons, starting a vegetable garden from seed presents enthusiasts with unique opportunities for growth, both in their gardening skills and their relationship with food.
Essential Tools and Supplies You’ll Need
Starting a vegetable garden from seed requires a selection of essential tools and supplies to ensure a successful growing experience. First and foremost, seed trays are vital for germinating seeds. Choose trays with drainage holes to prevent waterlogging, as excess moisture can lead to mold and root rot. Consider investing in biodegradable trays made from peat or coconut coir, which can be directly planted into your garden, minimizing transplant shock.
Potting soil is another critical component. Opt for high-quality, organic potting soil formulated specifically for seedlings. This ensures adequate drainage and nutrient availability, which are essential during the early stages of growth. Avoid using garden soil, as it may contain pests, diseases, or weed seeds that can hinder your garden’s productivity.
Plant labels are often overlooked but are indispensable for tracking different seed varieties as they sprout. Use durable labels made of weather-resistant material, ensuring they can withstand outdoor conditions. Organic markers are also a great choice, avoiding any harmful chemicals that could leach into the soil.
A watering can is essential for delivering moisture evenly and gently to your seedlings. A can with a detachable spout provides flexibility, allowing for precise watering without overwhelming young plants. Additionally, consider using a spray bottle for delicate seedlings that require a gentle mist rather than direct pouring.
Beyond these basics, there are lesser-known tools that can enhance your gardening experience. A seedling heat mat encourages germination by providing consistent warmth, especially for seeds that thrive in warmer conditions. Lastly, a small hand trowel is useful for transplanting seedlings into your garden while minimizing root disturbance. By gathering these tools and supplies, you will set a solid foundation for your vegetable garden and nurture your seedlings effectively.
Choosing the Right Seeds for Your Garden
Starting your vegetable garden from seed can be an enjoyable and rewarding experience. The first step in this journey is selecting the right seeds based on a range of factors, including your climate, available space, and level of gardening expertise. By choosing the right seeds, you set a strong foundation for a fruitful garden.
When considering climate, it is essential to know your USDA Hardiness Zone, as this will greatly influence the types of seeds that will thrive in your area. For instance, warmer climates may support a wider variety of vegetables, while colder regions might be limited to cool-season crops such as spinach and broccoli. Understanding the growing season is crucial, as some vegetables require longer periods to mature while others can be sown directly into the garden later in the spring.
The choice between heirloom and hybrid seeds also plays a significant role in your gardening success. Heirloom seeds are traditional varieties that have been passed down through generations, known for their robust flavors and adaptability. They are often more resilient to local conditions. In contrast, hybrid seeds are engineered for specific traits—yield and disease resistance, for example—but may not offer the same flavor profile as heirloom varieties. Each gardener should weigh the merits of these options based on their gardening goals and preferences.
Another important consideration is the available space for your garden. If you have limited space, opting for compact varieties or those that can be grown vertically can make the most efficient use of your area. Moreover, experimenting with various seed types can lead to delightful discoveries in tastes and cultivation methods. Observing which vegetables thrive in your unique environment may inspire you to create a personalized gardening plan tailored specifically to your needs.
Preparing Your Soil Like a Pro
Soil preparation is the cornerstone of a successful vegetable garden. Without the right foundation, even the most meticulously planted seeds may struggle to thrive. There are several types of soil that can be utilized for gardening, including sandy, clay, and loamy soil. Each type has its unique properties, impacting drainage, nutrient retention, and overall plant health. For instance, while sandy soil drains quickly, it may not hold nutrients effectively, whereas clay soil retains moisture but often lacks aeration.
To cultivate a thriving vegetable garden from seed, it is crucial to assess your soil composition effectively. The first step is to test the soil’s pH level, which should ideally fall between 6.0 and 7.5 for most vegetables. A simple home test can provide valuable insights into your soil’s acidity or alkalinity. Understanding your soil’s nutrient profile is equally important, as plants require a balance of essential nutrients like nitrogen, phosphorus, and potassium to develop properly.
To enrich the soil, consider incorporating organic matter such as compost or well-rotted manure. These amendments not only improve soil structure but also enhance the nutrient content. Many seasoned gardeners can attest to the virtues of adding compost; however, missed this critical step once, a friend of mine ended up with a garden hosting more weeds than veggies! That incident taught me that preparation cannot be overlooked. It’s also advisable to rotate crops each season; this helps in maintaining soil health and preventing nutrient depletion.
Little secrets for getting your soil just right include ensuring proper aeration through tilling and mixing. Additionally, using mulch can help suppress weeds and retain moisture. By dedicating careful attention to soil preparation, you set a strong foundation for your vegetable garden, maximizing the chances of a bountiful harvest. Remember that great gardens begin with great soil!
Sowing Your Seeds: Techniques and Tips
Starting your vegetable garden from seed is an exciting endeavor that requires attention to detail, particularly when it comes to sowing your seeds. One of the first considerations is the depth at which to plant the seeds. Generally, smaller seeds should be sown at a shallower depth, roughly twice their diameter, while larger seeds can be planted deeper, often three to four times their size. It is essential to refer to the seed packet, as each type of vegetable will have its specific requirements.
Another critical factor to consider when sowing your seeds is spacing. Proper spacing ensures that your plants have enough room to grow, thus reducing competition for nutrients, water, and sunlight. For example, densely packed seeds often lead to stunted growth or leggy plants that stretch toward the light. A humorous mishap shared by an amateur gardener highlights this lesson; they once planted pumpkin seeds just a few inches apart, resulting in an overwhelming tangle of vines that choked each other out. Learning from this experience, they later utilized a ruler to ensure proper spacing and achieve a more successful crop yield.
Watering techniques are equally vital as they directly affect germination rates. After sowing your seeds, it is crucial to water them gently but thoroughly. A fine mist or a light shower can help prevent the seeds from being displaced. Over-watering, on the other hand, can lead to seed rot, while under-watering can result in poor germination. To maintain ideal moisture, consider covering the sowed area with a fine layer of mulch or using a seedling heat mat to create an optimal environment for germination.
By focusing on depth, spacing, and effective watering techniques, you can set the foundation for a fruitful vegetable garden. Each season is a learning experience that contributes to your developing gardening skills. Those casually humorous incidents serve as reminders that growth, much like gardening itself, can be unpredictable yet rewarding.
Caring for Your Seedlings
Establishing a robust foundation for your vegetable garden begins with the careful nurturing of your seedlings. Optimal care is crucial during this delicate stage of growth, as it directly influences the success of your plants. The primary factors to consider include light, temperature, and moisture levels. Seedlings generally require 12 to 16 hours of light daily, which can be achieved through natural sunlight or supplemental grow lights. Adequate lighting ensures that the seedlings develop strong stems and lush foliage, minimizing leggy growth.
Temperature regulation is equally vital. Most vegetable seedlings thrive in temperatures ranging from 70°F to 75°F during the day and can tolerate slightly cooler nighttime temperatures. To maintain these levels, gardeners may utilize heat mats, especially for crops like peppers and tomatoes that prefer warmth. It is critical to monitor temperature fluctuations, as extreme heat or cold can hinder the seedlings’ development.
Moisture levels must also be carefully balanced. While seedlings need consistent moisture to germinate and grow, overwatering can lead to root rot and hinder their progress. A general rule of thumb is to keep the soil consistently damp but not soggy. Employing a spray bottle or a watering can with a fine spout can help achieve the desired moisture level without overwhelming the delicate roots. Observing the seedlings’ leaves can provide cues about their moisture needs; if they appear droopy or curled, it may signal dehydration or excess water.
Thinning seedlings is another necessary step; this process involves removing some seedlings to ensure that the remaining plants have sufficient space, nutrients, and light to thrive. For instance, if you have seeded a tray with lettuce, thin them out so that each plant has about 4 to 6 inches of space. This practice prevents overcrowding and promotes healthy growth.
Transplanting seedlings should usually occur when they have developed their first true leaves. After hardening off your seedlings — a process that involves gradually acclimating them to outdoor conditions — it is time to transfer them to their permanent garden beds or containers. Remember to handle the seedlings by their leaves and not their stems to avoid damage. Following these practical guidelines can lead to thriving seedlings, setting the stage for a flourishing vegetable garden.
Dealing with Pests and Diseases
Establishing a thriving vegetable garden from seed entails navigating various inevitable challenges, especially the presence of pests and diseases. These garden invaders can undermine your hard work, but with strategic approaches, you can mitigate their impact. Implementing natural pest control methods is often the most effective and environmentally friendly option. For example, introducing beneficial insects such as ladybugs can help control aphid populations, while planting companion plants like marigolds can deter nematodes and other harmful insects.
Regularly inspecting your plants is crucial for identifying signs of disease early. Common issues such as powdery mildew, root rot, and blight often manifest through specific symptoms, including discolored or wilting leaves. Maintaining good garden hygiene—removing debris and practicing crop rotation—can significantly reduce the likelihood of disease outbreaks. Additionally, ensuring that your plants receive proper air circulation and watering can help prevent moisture-related diseases.
In my gardening experience, I once faced an unexpected invasion of cucumber beetles that threatened my seedlings. After some research, I began using a simple garlic spray to deter them and set out traps made from yellow sticky paper to catch the adult beetles. These methods were not only effective but also provided an opportunity to educate myself about my garden’s ecosystem. Acknowledging that pests are a part of gardening allows for a more resilient mindset, encouraging you to adapt and learn rather than feel defeated.
By employing these natural pest control strategies and remaining vigilant, you can successfully navigate the challenges posed by pests and diseases. Your vegetable garden can flourish despite occasional setbacks. The key is to cultivate a proactive approach, integrating learned experiences into your gardening practice, which ultimately leads to a more abundant harvest.
Transplanting: When and How to Move Your Seedlings Outdoors
Transplanting your seedlings from indoor trays to the outdoors marks an exciting transition in your gardening journey. Timing is critical to ensure your young plants thrive in their new environment. Generally, seedlings should be transplanted after the danger of frost has passed and when they have developed a sturdy stem and at least two sets of true leaves. This timeframe varies depending on your local climate and the specific vegetable varieties you are growing. For example, tomatoes and peppers thrive when the soil temperature reaches about 60°F (15°C), while more cold-tolerant crops, such as lettuce or spinach, can often handle cooler conditions.
Before transplanting, it’s essential to harden off your seedlings, a process that helps them acclimate to outdoor conditions and reduces the risk of transplant shock. Hardening off involves gradually introducing your seedlings to outdoor exposure over a period of 7 to 14 days. Start by placing them in a sheltered area for a few hours each day, gradually increasing their exposure to sunlight, wind, and fluctuating temperatures. This careful acclimatization will enhance their resilience.
When the time comes to transplant, choose a cloudy day or transplant later in the afternoon to minimize sun stress. Dig holes that are deep enough for the roots to spread but not so deep that the stems are buried. Gently remove your seedlings from their containers, taking care not to damage the roots. Place each seedling into the hole, backfill with soil, and water thoroughly to settle the soil around the roots. A humorous mishap from my gardening experience involved planting my seedlings too deeply, resulting in insufficient sunlight, but I learned quickly from that mistake, and it became a valuable lesson for future seasons.
By following these steps and considering the needs of your plants, your seedlings will transition smoothly into their new outdoor environment, setting the stage for a bountiful harvest.
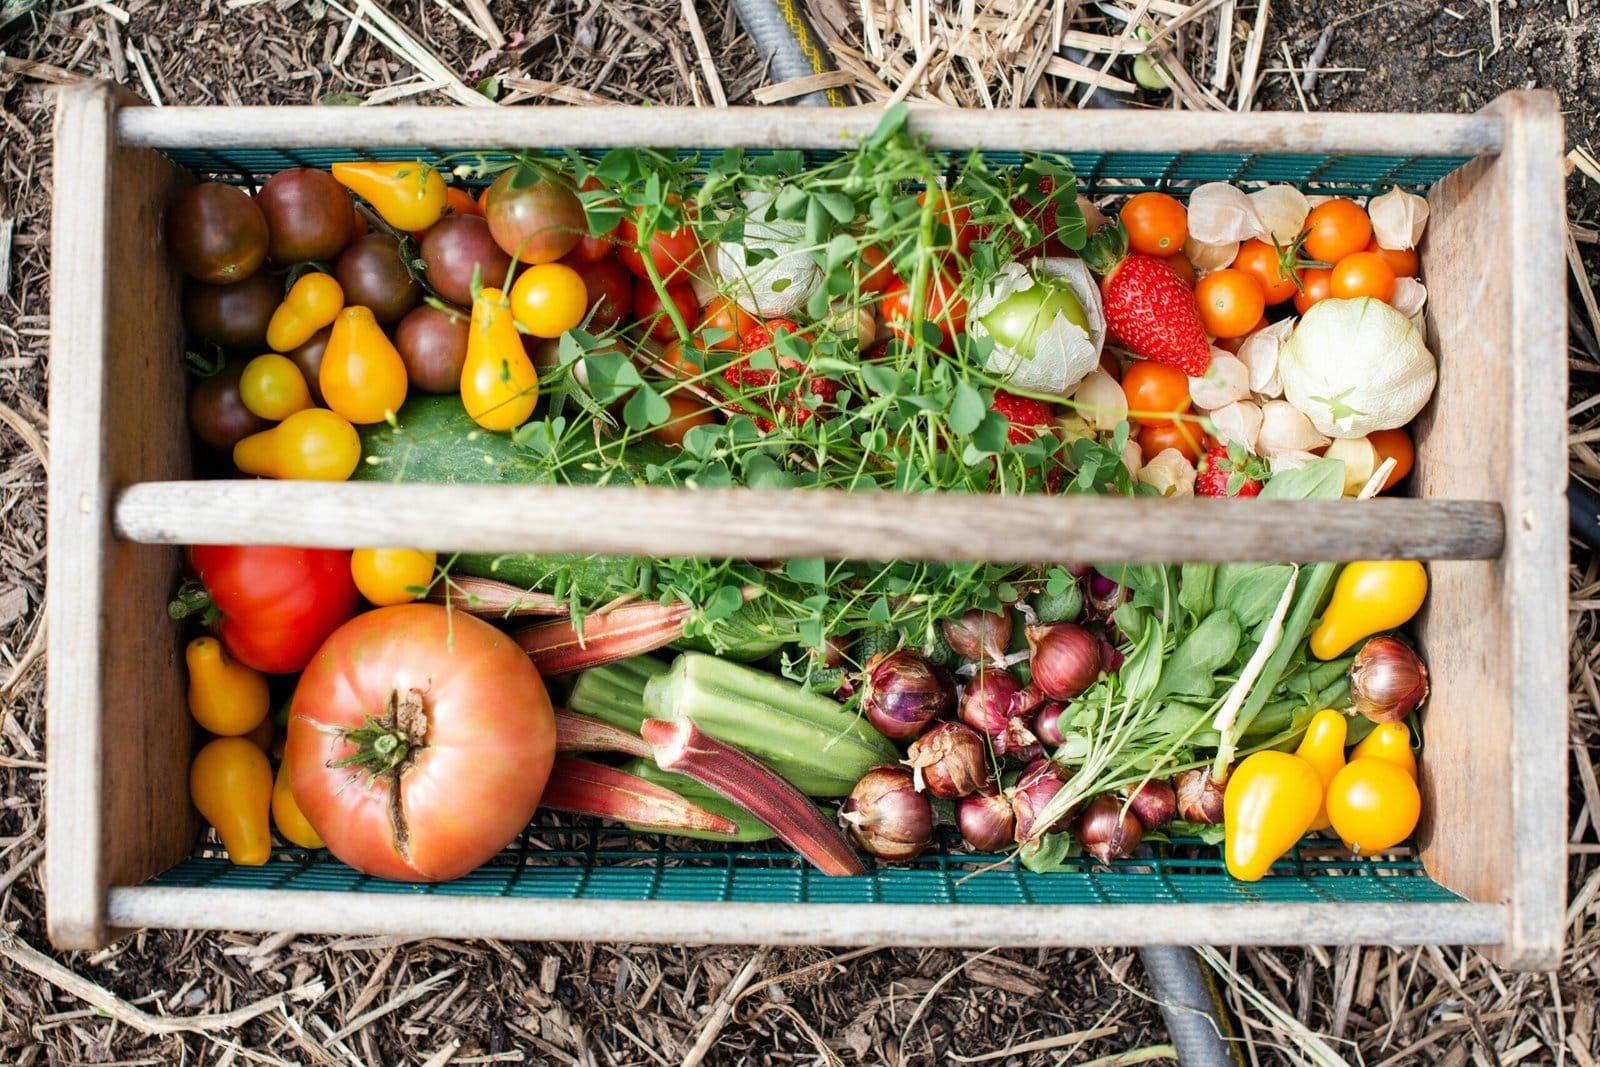
Celebrating Your Harvest: Enjoying the Fruits of Your Labor
Harvest time is often regarded as the pinnacle of one’s gardening endeavors. After dedicating substantial time and effort to nurturing your vegetable garden from seed, the joy of reaping the rewards is truly fulfilling. This is the moment when all your hard work pays off, and the satisfaction derived from harvesting your own produce cannot be overstated. The vibrant colors and rich flavors of homegrown vegetables are unparalleled, and they afford a sense of pride that store-bought produce simply cannot match.
Once your vegetables are ready for harvest, consider experimenting with various recipes that highlight their flavors. For instance, freshly picked tomatoes can be transformed into a delicious salsa, while harvested greens can be used in salads or sautéed as a side dish. Incorporating your homegrown ingredients into meals not only enhances the culinary experience but also allows you to showcase the fruits of your labor to friends and family. Sharing these creations can foster social connections, as you invite others to partake in the experience of enjoying your garden’s bounty.
Additionally, involving friends in the harvesting process can create joyful memories and strengthen relationships. Consider hosting a harvest party where everyone contributes by bringing a dish made with freshly picked ingredients. This communal aspect not only celebrates your successes in the garden but also allows for a delightful exchange of tips and experiences. Many gardeners have stories of mishaps along the way—unanticipated pest invasions, unforeseen weather challenges, or even an unexpected glut of produce. Sharing these humorous tales can nurture a sense of camaraderie among fellow gardening enthusiasts.
An important aspect of gardening is the community that often develops around it. Encouraging others to share their harvest experiences fosters an inclusive atmosphere, where both triumphs and tribulations can be shared and celebrated. Embracing the joy of harvesting from your vegetable garden is a wonderful way to honor the journey you have undertaken, creating lasting memories along the way.
Other related posts from our website:
https://howtobuildahouseblog.com/organic-vegetable-garden-ready-to-take-on-the-challenge/
https://howtobuildahouseblog.com/10-chives-companion-plants-for-a-pest-free-garden/
https://howtobuildahouseblog.com/the-garden-in-january-and-february-bring-spring-forward-faster/
Thank you so much for your attention.
Stay tuned. We will upload many other amazing posts to our website and videos onto our YouTube channel.
Thank you so much.
for your time and attention.
Best Regards
See you at another post,
Bye, Bye


